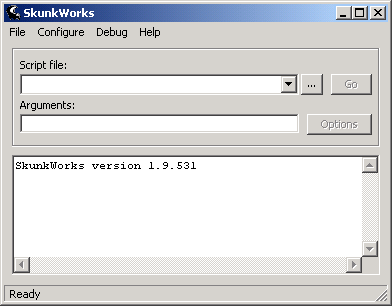
Macros written in script (be it VBScript, JScript, or any other Windows scripting language) run under the SkunkWorks console. Use Start 4 Programs 4 SkunkWorks 4 Console to bring up the console, which looks like this:

At the top, below the menu bar, you'll see a dropdown list of recent scripts along with a browse button for finding a script on disk. If your macro consists of a single script file (and no libraries), you can enter its name directly in the combo box, or browse for it using the browse button. If your macro involves more than one script file (including libraries), you'll need to create a SkunkWorks project and specify the project name here.
There's also a blank in which you can provide any arguments your script takes. These arguments are made available to the script via skapi.szArgs and ac.Arguments.
The Go button starts the chosen script.
The Options button brings up the Project Options dialog. See Creating a project for details.
Below the controls is a text box for console output. Messages passed to skapi.OutputSz and ac.Print appear here, along with error messages and such from SkunkWorks itself.
Menu commands are as follows:
This also works (after a fashion) with the Microsoft Visual Studio debugger if you have that installed instead of the Script Debugger.
A SkunkWorks macro can be contained in a single .js or .vbs file, but it doesn't have to be. You might find a large script easier to work with if you break it up into several smaller files. Or you might want to use a third-party library (such as ACScriptLib.js) as part of your script.
In such cases you should create a SkunkWorks project, which you can do by using the File 4 New command to bring up the Project Options dialog. You can also use the Options button to change the options of an existing project.
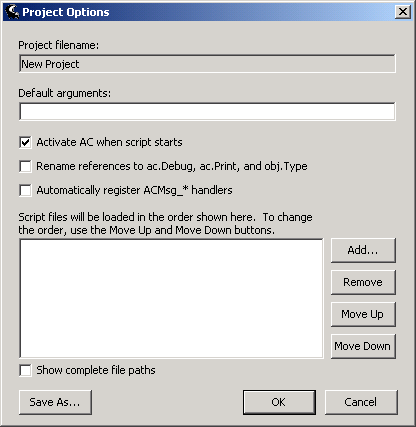
The Project Options dialog looks like this:

The full path of the project file appears at the top. In the case of a new project, you'll be prompted for a filename when you click OK.
Below that is a blank where you can enter any default arguments your script takes. When you load the script into the console, these arguments are placed into the console's Arguments blank where you can edit them before starting the script.
The Activate AC... checkbox, if checked, causes Asheron's Call to be brought to the foreground when the script starts. If unchecked, SkunkWorks keeps the focus and AC remains in the background. (This is similar to ACScript's –N option.) Note that you can also activate AC programmatically from within your script using skapi.ActivateAC.
The Rename references... checkbox enables a compatibililty hack for scripts migrated from ACScript. For stupid technical reasons I was unable to declare methods named Print, Debug, and Type (because those are reserved words in Visual Basic), and had to name them Print_, Debug_, and Type_ instead. If you're getting errors related to these functions, turn on Rename references... to tell SkunkWorks to automatically fix up the references in your script as it's loaded. This can be time-consuming for large scripts, so you may prefer to do the renames yourself in your script source and leave this option turned off.
The Automatically register... checkbox is another ACScript compatibility feature. By default, SkunkWorks does not automatically register ACMsg_* functions. If you're migrating a script from ACScript and your event handlers aren't firing, turn on Automatically register... to enable automatic registration of these handlers. This can slow down your script's load time somewhat, so you may prefer to leave this option unchecked and change your script to register all handlers explicitly using ac.RegisterHandler.
Below the checkboxes is a listbox containing the names of the script files in your project. To add or remove script files, or to change the order in which they load, use the buttons at the right. You can mix script files of different languages in the same project, so for instance VBScript coders can include libraries written in JScript, and vice versa. Each individual script file, however, must be written entirely in a single language, and have the appropriate filename extension for that language (.vbs for VBScript, .js for JScript, and so on). If you're not sure what extension to use, check the "Files of type" dropdown in the Add... dialog.
Note that there are no built-in facilities for creating or editing the actual script code. Since a script file is just a text file, use Notepad or any other text editor to create it before adding it to your project here. Double-clicking a script file in the list opens the registered editor for that file type (usually Notepad).
By default, file paths are omitted from the script file list and only the filename proper is shown. To see complete paths, check the Show complete file paths checkbox.
When done, click OK to save your project and return to the main console window. If the project is a new one, you'll be prompted for a filename; otherwise the project will be written back to the filename shown at the top of the dialog.
If you're migrating a script from ACScript, here's another way to create a SkunkWorks project for it:
XML aficionados may be interested to know that a SkunkWorks project file is simply an XML file with the .swx extension. So yet another way to create a project is simply to type it in using your favorite XML editor. Spend a bit of time studying the sample projects and playing with the Project Options checkboxes and you should get the hang of it.
To run a script under SkunkWorks, first make sure that Decal is running and that the SkunkWorks plugin is enabled. You can start your script either before or after logging in to the game. If your script logs you in automatically, or needs to see the OnLogon event, then obviously you'll want to start the script first. If the script assumes you're already logged in, you'll want to log in manually and then start the script. Either way you still get full information about your character, your inventory, and other objects in the game world.
To start a script before logging in, bring up the SkunkWorks console, choose your script using the console controls as described above, fill in any desired arguments (or not, as you prefer), and click the Go button. You'll see some console activity as the script is loaded and initialized; when the status bar says "Running...", your script has control.
While the script is running, the Go button changes to a Stop button. Click Stop to forcibly interrupt your script and return control to the console (for instance if your script has gone haywire, or simply lacks a Stop command of its own). Note that the Stop button is polled by skapi.WaitEvent and ac.WaitEvent, so your script must call one of these functions periodically for the button to work. (If your script is more broken than that, there's always Ctrl+Alt+Del.)
To start a script after logging in, go ahead and log into the game as usual (making sure Decal is running of course). The in-game components of SkunkWorks (the plugin and netfilter) will check to see if the SkunkWorks console is running and launch it if necessary. Once in game you'll see a SkunkWorks button in the Decal bar; clicking it brings up a miniature in-game version of the SkunkWorks console:
![]()
The Script tab contains a dropdown list of scripts you can run, a browse button, and a Go button. These controls are connected through the plugin to the corresponding controls on the real console, so you can choose and launch your script from in game just as you would from outside. (Note that the in-game file browser behaves a bit differently than a standard Windows Open File dialog, but should still be fairly self-explanatory. Just remember to click OK instead of double-clicking, since Decal lists don't support double-click events.)
There's also a Command tab containing a list of recently typed script commands. See the discussion of the OnCommand event for more information.
You can start and stop scripts from the in-game chat line using the following commands:
You can also run a script from a Windows command prompt or batch file as follows:
>SWConsole filename [−A "arguments"] [−R] [−X]
filename is the name of the script to be run, usually a SkunkWorks project file.
The −A option specifies arguments to your script; the arguments text is simply inserted into the Arguments blank on the console, and overrides any default arguments specified in the project file.
The −R option runs the specified script. If this option is omitted, the project is loaded into the console but not started.
The −X option causes SkunkWorks to exit back to the command prompt when your script terminates. This can be useful as part of a sequence of batch file commands. If this option is omitted, the console remains open after your script terminates.
If there is already a SkunkWorks console running when you invoke SWConsole from a command prompt, the command line is passed to that existing console for execution. As a special case, if there is a script running in the existing console, you can stop it from a command prompt as follows:
>SWConsole −Stop
Scripts running under the SkunkWorks console have access to the following console API functions in addition to the ACScript and SkunkWorks API functions. Unlike the regular API functions, these console-specific functions are accessed through the console object rather than the skapi object. Note that the console object is implemented by SWConsole.exe, not by Skapi.dll, and is therefore visible only to console-hosted scripts, and not to direct COM clients of Skapi.dll.
Method or property |
Result type |
Description |
|---|---|---|
|
String |
The full file path of the currently running script. |
|
|
None |
Clears the console output window. |
|
|
None |
Stops the currently running script and returns control to the console user interface. This is equivalent to clicking the Stop button. |
|
|
None |
Stops the currently running script and starts the script named by szFile. One use for this is in an automatic login script that detects the logged-in character's name, selects an appropriate script to run, and then calls console.RunScript to run it. Another possible use is to restart the current script from the top by calling console.RunScript(console.szScript). |
|
|
None |
Raises or lowers the thread scheduling priority of the running script. priority is a number between -2 and +2. Zero is the the normal thread priority; positive numbers raise the priority and negative numbers lower it. When the script exits, the thread priority automatically reverts to zero (normal priority). CAUTION: Use this function with care, if you use it at all. Raising your script's priority may improve script performance, but at the cost of game performance. Carrying out lengthy calculations at high priority can lower the game's framerate to zero, possibly resulting in character death or loss of server connection. Unless you know what you're doing, it's generally best to leave the priority alone and trust the OS to schedule things fairly. |